Monday, June 27, 2011

Cheap Thrills


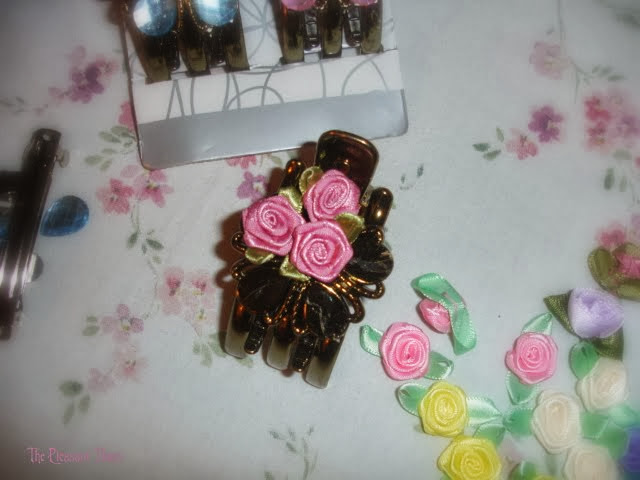
My Fifty Cent Hair Clip

 The local Dollar Tree was selling these hair clips for a while, 2/$1.00. They were really a nice shape and worked well on my hair, only the "jewels" came off too easily. With a good bottle of some sort of special glue (borrowed from the scale-model-maker next door) I was able to glue the cheap little gems back on. I found other glues did not work very well; and this one worked a little better than the others.

But one does not have to do that; using one's craft stash, one can instead try these variations:
 Using a barrette "blank" from the craft stash, you can make up your own customized barrette, arranging the jewels as you like them.

What to do with the empty dollar store clip, though?
 Maybe it would look better with pink roses! Doesn't everything?
 Mauve-Pink ribbon roses glued on in place of the gems. That is .50 cents for a craft project! The ribbon roses were in my stash and cost me nothing, because...
They were free:)

Saturday, June 25, 2011

A bit of inspiration for you

Life is real, life is earnest,
And the shell is not its pen –
“Egg thou art, and egg remainest
Was not spoken of the hen.

Art is long and Time is fleeting,
Be our bills then sharpened well,
And not like muffled drums be beating
On the inside of the shell.

In the world’s broad field of battle,
In the great barnyard of life,
Be not like those lazy cattle!
Be a rooster in the strife!

Lives of roosters all remind us,
We can make our lives sublime,
And when roasted, leave behind us,
Hen tracks on the sands of time.

Hen tracks that perhaps another
Chicken drooping in the rain,
Some forlorn and henpecked brother,
When he sees, shall crow again.

-"A Parody on A Psalm of Life" Attributed to Oliver Wendell Holmes

Photo: The Pleasant Times chicks enjoying a day out.

Posted by Picasa

Wednesday, June 22, 2011

June Fashion Ideas


From the 1908 Good Housekeeping Magazine

Summer Fashions

Sunday, June 19, 2011

Blue Daisy Dress

By The Pleasant Times Sewing Editor, Miss Thread


We are featuring a dress designed by one of our in-house designers here at The Pleasant Times Sewing Room. She drew this:


Puffed sleeves, a-line shape, empire waistline, and scallops on the hem. I chose to make the bottom drawing, with the smaller scallops.

Using several patterns, this was the sewn result:
Details:
Fast and easy with no buttons or zippers. I used a McCall's pattern for a pull-over-the-head nightgown, and changed the gathered skirt into one big box pleat in the middle front and back for a smoother look. I adapted a puffed sleeve from a Daisy Kingdom pattern. The scalloped piece on the hem was hand-drawn, and amazingly, it fit with just minor adjustments at the side seams. It would be lovely, some day, to have one of those nifty scallop making gadgets like the quilters use! I used a roll of - cough cough- duct tape, and drew around it on paper to make a pattern. One could use a bone china tea cup from the china closet, of course, to draw the circles, if one wasn't in such a hurry. It would be a much more elegant sewing experience that way!

Saturday, June 18, 2011

New Blouse from the Rag Bag!


By The Pleasant Times Sewing Editor, Miss Thread
I was inspired by a post on Cultivating Home to try renovating a stained dress shirt. I used a small boy's shirt from the rag bag, the buttons already off, and tried my hand at turning it into a little girl's blouse. There was nothing to lose, because if I messed it up I could just throw it back in the rag bag:)

Since it is a blouse for a little girl, it did not need any shaping, just some bringing in extra fullness with some box pleats. The grand thing about the two pleats on the front is that they hid the stain! I left the neckline sort of high and it is just right with the little ruffle! I used pink thread, even finishing the edges of the neck ruffle in a pink zig-zag stitch, and put on new buttons.
Here's the back, with one big pleat to bring in fullness.
I really, really like the finished result! Sometimes, when I am finished constructing a garment, I am too tired to "embellish" my sewing with the fun details. And since I did not have to construct the blouse (no setting in sleeves or sewing in facings or marking buttonholes!) I had time for the extra decorative stitching. The coordinating skirt material came from the scrap stack and was super easy to make. A girl's outfit in an evening!

Posted by Picasa

Monday, June 13, 2011

More about the Lettuce Edged Blankets

By The Pleasant Times sewing editor, Miss Thread

Last post I mentioned I would be talking more about the lettuce edging on the blankets. It was the first time I had used knit fabric, and done a lettuce edging. I found advice at this blog, which I followed; it was very helpful. However, I came under the "too impatient" category, pulled a bit too much and had many gaps in my edging! Also, only two sides would curl under on their own (to make a nice finished edge) as the other two were not as stretchy (remember I was doing a square blanket-- two sides on the "grain" I guess). Plus, I had to be careful because my machine likes to get "stuck" on a satin stitch and build up a thread mound! This is the way I worked around those difficulties:
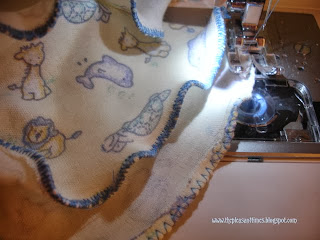
 First off, to get the edge to curl right and fold over on itself while sewing, I had to run the edge of the material through the little gap in the presser foot. I hope you can see it in the middle of the foot above.
 I'm not sure you can see this, but I have inserted the material in the gap.
 Now as I zig-zag, it is a little more cooperative and folds over. Notice on the material in the back, the zig-zag stitching is not all nice and satin-stitch-like. I decided instead of stretching, pulling, folding, and satin stitching all at the same time, then going over it again to fix my errors, I would just run the edge through fast with a long zig-zag stitch first. I did all the folding and stretching and did not worry about gaps on this first run-through. The, I went over it again, slower, with a closer zig-zag.
It still was not a perfect satin stitch edge, but it was a bit easier for me to do it this way. I am eager to buy some knit fabric and try my hand at it again! Maybe someday I can conquer the satin stitch on my machine, too.

Thursday, June 9, 2011

sleepy chicks

The little fuzzy balls are chicks that are all hunkered down for the night. They resisted sleep most of the day, but at last they all cuddled up and succumbed to it. They were so funny, just like people, for they would start to droop, and then jerk themselves awake with a start. Then their little heads would droop again, and their beaks would hit the hay. Sometimes one would get the idea that she'd rather be in the middle, and step on all the others and wake them up!

But oh, the poor little things need a mama hen, don't you think? It is good they have each other to cuddle with; and even though they were raised in an incubator, they probably have an instinct (just as they do for food, water and scratching) to go and get under mama hen's wing.
Posted by Picasa

Wednesday, June 8, 2011

The Latest Additions

Meet the chicks. They are two days old. All six of them are providing a lot of interest here at The Pleasant Times!
There are 3 Ameraucanas (they lay the green eggs), one Rhode Island Red, one Blue Andalusian, and one Welsummer that is supposed to lay a very dark brown egg.
But, oh, my, what an unfortunate choice of a box to keep them in! Truly, we got the chickens for eggs, not for bakin' !
Posted by Picasa

Saturday, June 4, 2011

Fun Sewing and Fun Labels!

 By The Pleasant Times Seamstress, Miss Thread
Photography by N.O. Phocus

I have had so much fun sewing with The Pleasant Times staff lately, let me share with you some of the newest  projects!
 A few fat quarters made this version of Quaint and Quirky's Simple Quick Bag. Since this wasn't a "last minute" project, it could be gussied up some by adding an extra band of contrasting material.  The tutorial is really simple and quick, and I would encourage you to go and try it! This bag is smaller than the one in the tutorial; it was made for a baby shower, designed to fit one diaper and essentials. It used 3 fat quarters for the inside and outside of the bag (it's reversible!) plus the contrast band and handles.
 The stitching on the handles was done in coordinating colored thread.
 There were enough scraps left for a matching burp cloth. Sewing with fat quarters is a lot of fun! It was amazing to get so much out of what seemed so little.
 Inside the bag are four baby receiving blankets made of knit material. I learned to  "lettuce edge" them using my zig zag. More about that in another post.

 This quilt was mainly done by one of our Interns here at The Pleasant Times.
 I like the special corners!
 The quilting was a shared task. In between all the straight quilting rows are decorative stitch rows in color thread.
 It makes the back look really neat.


 Then I had fun making gift labels for them all! The Graphics Fairy had some wonderful free clip art frames, which were filled out using the Picasa photo program.

This one went on the quilt. 


 "Grab-n-Go Diaper Bag. Fill with one diaper and essentials; just grab and go for short outings! Coordinating Burp Cloth Included! REVERSIBLE."
This one was for the bag. The labels were attached to scrap paper, and decorated with Victorian scrap.


"Ruffled Baby Wrap: Keeps Babies Cozy and Happy."
This one was for the knit baby blankets. To make it look like an authentic product label, I had to make some kind of outrageous claim or promise. This one says the blanket keeps babies happy! Let's hope so!

Each one has its own colored label. 

They were pasted on to scrapbook paper strips, then wrapped around each blanket. 

These labels are wrapped around home-made soaps. 

The little tub is filled with the soaps and baby washcloths made by someone in our crafts studio. 

 It was so much fun to put the gifts together and attach the labels! I felt that it was the perfect finishing touch.


Friday, June 3, 2011

Not a Proper Lawn At All

Our lawn is rather wild. But I like it that way.

Perhaps it is not as nice looking, but it is more interesting.
Things creep out of the garden to grow where "the grass is greener." Flowers and things like mint. The mint smells so nice when it's mown down!
Wild violets of purple, lavender and white grown in the lawn;
and of course the daisies;
and other little tiny wildflowers.
There are different kinds of grass:
some tall, some short, some fat, some thin, some lush, some not.

We have these little blue flowers, as well as pink wild geraniums. There are plenty of weeds, too. We have counted over 25 different kinds of plants growing in our lawn.
And we have this curly curiosity.
It smells like an onion and tastes like chives, but I have not looked it up yet to see what it is exactly.
 Pink geraniums have also taken root in a gravel parking lot next door.
 One surprise this spring were the brave little pansies that grew in the gravel.
 People must think parking lots are not for flowers.
 (though if it were my parking lot, I'd let them grow there)
 Alas, they suffered the fate of being poisoned by roundup. Poor little dears.