Showing posts with label Printables. Show all posts

Thursday, December 1, 2022

Can A Village Up and Move?


If it is my printable Christmas Village, it can! 

I have never seen such traffic as this year for my humble, hand-drawn Christmas village printables! They are free for you to print and craft with.

Unfortunately, because of an update problem with my Google Drive, I had to manually approve all shares of the village PDF. That made it inconvenient for my readers, to have to wait on me to do this (especially as some requests are coming in the middle of the night!). So I am moving the PDFs to a hosting platform called Gumroad. 

The village PDF's are still FREE to you and hopefully will more convenient (24/7 access!) now.  All the links in the Village posts are updated from Drive to Gumroad. And below are the links straight to the new platform. I hope this works out better for everyone!

ALL OF THE CHRISTMAS VILLAGE PRINTABLES!

Village Shops on Gumroad

Village Houses on Gumroad

Farmhouse and Barn on Gumroad

Meeting House and Woods on Gumroad  

Mt. Merry Christmas (Mountain Backdrop) on Gumroad

ALL OF THE CHRISTMAS VILLAGE POSTS!

#1 Meeting House

#2 Shops

#3 Houses

#4 Woods (example)

#5 Farm

#6 Mountain

NOTE! If your computer cannot handle heavy cardstock, print on lighter weight cardstock several times and layer 'em up! 


Monday, December 1, 2014

The Pleasant Times Christmas Village Mountain and Skater Additions

2022 Note: I was getting a lot of requests for access to the files ("request to view" in Google Drive or Docs).  No matter how I updated the settings I still had to manually approve many people. Therefore for this year I have moved the PDF to a new hosting platform so the updated links will take you there. It is still FREE and should be accessible to you all 24/7 without waiting on me to approve you!
Happy December! I'm very happy to announce that there are now some extra pieces to the popular Printable Christmas Village!

To give the village a little more depth, you can now print out this mountain background to put behind the village. There is also a little skating girl, which can be put in front of the village, though properly she should be put up as side piece to the town. (Mountain and Skater Here
Mountain Sides here)

The mountain is named "Mt. Merry Christmas." The credit for that name goes to one of our Field Editors, who is great at "discovering" and naming mountains. He graciously allowed me to borrow this unique name for my village mountain.

 If you are just starting with the village, you will want to edit the town and home pieces a bit. I would suggest cutting out the sky where you can, or just leaving it white. As you can see in the above photo, my original village had a snowy night time sky. I still think it looks great with the mountains in the background!

 Here we finally have a person in the village; I'm not terribly good at drawing people so until that changes this is all you get! Lest you think she looks lonely, let me assure you that she is not the only person in town. This little lady is the proprietress of the cocoa shack, and waiting for the other villagers to come out for an hour of skating under the stars.
 For a simple village, you can just color and cut the piece out. You can add glitter for a step up. If you print one more piece, you can cut one up and layer them on the other so some elements "stand out" more.
 Here is the skater with all of the above. The skater and pond are layered, the little cocoa house and a few of the Christmas trees are also layered.
 You can do the same thing to Mt. Merry Christmas, and the more copies you print out, the more layers you can do! Here I did two layers: the middle hill and the trees are separate layers.
 I hope you can see it better from this photograph what I'm talking about. If you print out one more, you can make the tall trees another layer. These trees are really tall- they are as tall as ship's masts.

Of course, you can leave it one layer and glitter it and it will still be lovely.
Once you have done as much as you want to do, you can tape the side pieces to Mt. Merry Christmas, and fold them inward slightly, so that the mountain ranges will stand up for you. 


You will notice one little moose/deer/elk (or maybe a new species!) who has ventured out of the woods. Perhaps he isn't afraid of the hunters since they are all at home by their warm fireplaces!


On the other side, there is a waterfall and a stream that isn't quite frozen up yet.

I will be adding these links to the original Christmas Village posts as well.

Enjoy and have a Happy December!

Mountain and Skater Here

Mountain Sides here

The original Christmas Village posts:

The Meeting House and Woods (PDF page) (blog post for the Meeting House ) (blog post for the woods)
The Village Shops (PDF page) (blog post)
The Village Houses (PDF page) (blog post)
The Farm (PDF page) (blog post)


If you have made up the Christmas village I'd love to see a picture! You can email me at 
"the pleasant times @ gmail . com" (no spaces)


Wednesday, August 6, 2014

Certificates of Baptism

Here are a couple of printable baptismal certificates. Sometimes these are hard to find at the local Christian bookstore. Having a "certificate" is really just a keepsake for the person to remember their baptism, and these should be printed halt-sheet-of-paper size to fit into the front of a Bible. 

One of the things that is recommended when I attend church, is to write a letter to yourself after your baptism, stating the reasons that you were baptized. Years later, this may be an important letter to you. Perhaps, you could print the certificate on one side of a sheet of paper, and leave the other side for writing the letter, and fold it in half so that behind your certificate in your Bible, is the letter your wrote to yourself about your baptism.  


 And now why tarriest thou? arise, and be baptized, and wash away thy sins, calling on the name of the Lord. -Acts 22:16
Go ye therefore, and teach all nations, baptizing them in the name of the Father, and of the Son, and of the Holy Ghost: teaching them to observe all things whatsoever I have commanded you: and lo, I am with you always, even unto the end of the world. Amen.  -Matthew 28:19-20

Here is an example of one that is filled out:
(The example "Main Street Church of Christ" could of course be a river or lake, "Missouri River" or "Lake Tahoe" or wherever)


As usual, the wonderful frames come from thegraphicsfairy.com-- there are so many pretty borders and frames to choose from over there so be sure to visit!

Friday, December 16, 2011

The Pleasant Times' Printable Christmas Village

2022 Note: I was getting a lot of requests for access to the files ("request to view" in Google Drive or Docs).  No matter how I updated the settings I still had to manually approve many people. Therefore for this year I have moved the PDF to a new hosting platform so the updated links will take you there. It is still FREE and should be accessible to you all 24/7 without waiting on me to approve you!

I hope The Pleasant Times' readers have enjoyed their free printable Christmas village!


You can make these as elaborate (by adding lots of glitter and cut-out pieces) or as simple as you please. They are also good to print out to keep little hands busy while you are wrapping presents or finishing up a project!

Here is the master list of links to each printable PDF, and a link to each blog post if you would like to see photos of how they look all made up.

The Meeting House and Woods (PDF page) (blog post for the Meeting House ) (blog post for the woods)
The Village Shops (PDF page) (blog post)
The Village Houses (PDF page) (blog post)
The Farm (PDF page) (blog post)

Mountain Background for the village was added here. See bottom of post for picture!

Here are some ideas of how to display your Christmas Village.
You can line them up all in a row on a shelf, mantel, or the window-sill (or two!);
you can put each section on different shelves in a bookshelf, and pretend they are different "streets:" a street of houses, a village street, and the country road;
 or you can scatter them around the room for interest.


I put a short string of Christmas tree lights behind mine; you can also put the LED plastic tea lights behind each one to make a glow.

When you are done with them for the season, you can fold them flat and put them in an envelope for next year. Or, you can cut out the centers and glue them on next year's Christmas cards!

Thanks for visiting! Merry Christmas!

UPDATE:
You can now print out a mountain scene to put behind the village.


Informational post here

Mountain and Skater Here


Thursday, December 15, 2011

Christmas Village part five: Country Farmhouse and Barn

2022 Note: I was getting a lot of requests for access to the files ("request to view" in Google Drive or Docs).  No matter how I updated the settings I still had to manually approve many people. Therefore for this year I have moved the PDF to a new hosting platform so the updated links will take you there. It is still FREE and should be accessible to you all 24/7 without waiting on me to approve you!

For those of you anxious to finish up your village, the printable PDF for the last two pieces are here.

The last bits to add are the barn and farmhouse!
The PDF for the last two pieces are here.

The PDF for the last two pieces are here.

I added paper windows in place of the cardstock windows, and here is what my barn looks like with the light shining through:
 And the farmhouse:
It wasn't until I printed this out and started to color it, when I realized that something was missing... a wreath on the door! I forgot to draw one, so you will have to add that yourself:)

I also did not mount any extra bits on, but were I to do that, I would cut out an extra sled for the house, and an several extras to the barn: the wagon wheel, barn star, the pump and the sheep behind the fence and haystack piece. Foam mounting tape is ideal for it, but I had success with just regular tape rolled up, too.

I hope you have enjoyed this series! Here are the links to the posts about the rest of the Christmas village:
The Meeting House
The Village Shops
The Village Houses
The Woods 
New! Mountains and Skater


Tuesday, December 13, 2011

Christmas Village part four: Over the River and Through the Woods

2022 Note: I was getting a lot of requests for access to the files ("request to view" in Google Drive or Docs).  No matter how I updated the settings I still had to manually approve many people. Therefore for this year I have moved the PDF to a new hosting platform so the updated links will take you there. It is still FREE and should be accessible to you all 24/7 without waiting on me to approve you!

Part Four of our printable paper Christmas Village!

Remember the Woods from the printable in the first post, that printed out with the Meeting House? I said we would use them later on. Now you can add the woods to your Christmas Village (if you haven't already!)

 (If you did not print out the first part of the village, or lost the woods part, here is the link to the PDF printable.)

When you leave the village, you'll go through the woods to the countryside. Maybe that is Grandmother's house behind all the trees!

This is what I did with mine:
 I cut around each tree for interest, but you can just cut straight across and color in the sky to make it simple. All the trees are covered in snow, which cuts down on the amount of coloring you have to do, but of course if you want to color them in you can.
I used big chunky glitter over Elmer's glue on mine-- I imagine each tree has about six inches of snow on it, and about a foot of snow on the ground, and the chunky glitter worked delightfully for that effect.

You can cut out more trees to layer with mounting tape for dimension, and also cut out an extra stone bridge and mount it over the other one. You can mount another Christmas tree over the other as well, but I chose to do another effect on mine. I took a straight pin and poked little holes where the string of lights are. When there is light behind the woods, the lights on the tree "turn on!"
The Christmas tree really stands out with no snow and its string of lights! (Don't ask me how the lights are working out in the woods-- probably a really long extension cord, or battery pack, or a hidden generator! Or maybe they are solar!)

Here are the posts for the previous parts of the Christmas Village:

For part one of the village (Meeting House and woods), click here.
For part two of the village (the shops that connect to the Meeting House) click here.
For part three of the village (the houses) click here
For part five of the village (the farm in the country) click here.

For the last addition, the mountain backdrop, click here


Monday, December 12, 2011

Christmas Village part three: Houses


2022 Note: I was getting a lot of requests for access to the files ("request to view" in Google Drive or Docs).  No matter how I updated the settings I still had to manually approve many people. Therefore for this year I have moved the PDF to a new hosting platform so the updated links will take you there. It is still FREE and should be accessible to you all 24/7 without waiting on me to approve you!

Here are a couple of houses to round out the village (click here for part one and here for part two, here for part four and here for part five). (Click here for the mountain backdrop) There will be a country scene next, so check back this week!
 This house (Click here for the PDF printable) is a cozy cottage, with a pie cooling in the kitchen, and gift wrapping going on in the library. The house glows in the snow with lots of Christmas lights! I colored my copy with crayons, but saved the Christmas lights for some bright bold markers, so they would stand out. On the printable, there is also a side yard with a snowman, and two kittens playing.
This is a grand house (Click here for the PDF printable), which could be all lit up for a Christmas party, I suspect. I felt there were enough lines in this drawing, so I did not add any more detail to the windows for you, but you can color in red velvet curtains, or evergreen swags (as I did with markers) and of course put lots of glitter snow on the windowsills! There is a garden on one side with a garden shed, and a mailbox on the other side for Christmas cards.

Here is the grand house, all lit up. This time I used markers on the paper behind the windows for the Christmas tree and the swags I added to the windows. I think it stands out really nicely when the lights are behind it.

Click here for the PDF printable. 


As you can see, my village is getting quite long! The two houses can be displayed on either side of the village shops, together on one side or the other, or by themselves. I did not want to glue them to the village shops as it would be too long to move and store, but of course you can attach them if you like.
I did the same cut-out and glue-paper-behind windows, and mounted some features as I described in the last post. On the yellow cottage, I mounted another front porch, and another snowman and tree over the printed ones. I'll try to add a better photo later on!

I'm listening to "Sleigh Ride" and other Christmas songs as I am glittering and posting these houses! It makes an enjoyable evening. Print enough out for the children to color, too!

For the Meeting House, click here.
For the Village Shops, click here.
For the post on the woods (that came with the meeting house page) click here.
For the Farm in the country, click here.
New! Mountain background and skating figure here.


Sunday, December 11, 2011

Christmas Village part two: Shops


2022 Note: I was getting a lot of requests for access to the files ("request to view" in Google Drive or Docs).  No matter how I updated the settings I still had to manually approve many people. Therefore for this year I have moved the PDF to a new hosting platform so the updated links will take you there. It is still FREE and should be accessible to you all 24/7 without waiting on me to approve you!

I am thrilled to bring you the shops to the printable Christmas village this evening! The moon is rising here, and after days of fog, we can finally "see out." A nice night to go and see the shops all lit up!

The printable Shops for the sides of the village are here. Print out on card stock.

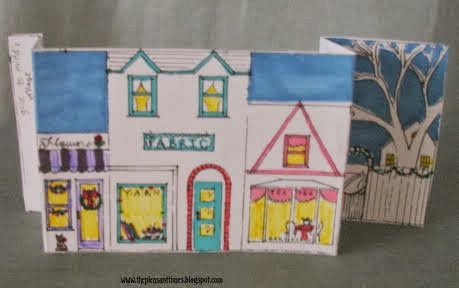
These buildings were inspired by the buildings in Old Town Florence, a popular tourist destination on the Oregon Coast. You cannot leave a visit to the windy Florence beaches without stopping in Old Town for salt water taffy, at least! Perhaps in our village, the taffy can be had at the General Store. A "Cottage" decor style shop (which is based on a real one that, alas, moved away) is included in this shopping street. There is a florist shop, a fabric and yarn shop, and a tea room with a bakery. There are also little gardens beside the shops.

This street of shops is designed to glue to either side of the Meeting House piece of the village. Your village street will look like this:


The printable Shops for the sides of the village are here. Once you are on the document page, look for "File" and then click "print." Print out on card stock.

Once your shops are printed and cut, you will fold two ends back, so it stands as seen in the photo.  As with the Meeting House, I colored in the shops with markers. I did use some crayon and colored pencil to get just the shades I needed here and there. All my shops are white or very light pastel, it just makes it faster for me. You can of course color them anything you like! Maybe some of the shops would be red brick in your village.

You may also, if you desire, cut off the sky in any piece in the village, if you do not want to take time coloring it. I colored mine a darker blue and put glitter "stars" in it, and of course you can color yours gray, light blue, sunset pink, or leave it white.

Then you can glitter them! Before I glittered mine, though, I added some extra touches to my shops, and here is what I did:

TO MAKE WINDOWS THAT LET LIGHT THROUGH:
 After I had colored in the shops, I made a color copy on plain paper. I could have just printed a black and white copy and colored it again, but I was in a hurry to get this post to you! (I will be showing several copies of my colored piece in paper and card stock for some extra effects below. If you want to do the "extras" you may want to make several copies to play with.)

 Here is how I made the windows: I trimmed down the paper copy.
 On the card stock, I cut out all the windows.
 Then I pasted the paper behind the window holes, lining it all up, and this way the light will show through the windows. That is what I did on the Meeting house. Notice, though the three window holes left? That is for my next extra-special touch:

TO MAKE SOME ELEMENTS "STAND OUT:"
 I made another card-stock copy of the shops. I cut out elements of it to mount on the original, so that I have some bits that stand out and create dimension. To this bit, I cut out the upper windows and pasted some paper windows behind it.
 I used a paper copy of the bay window of the Tea Room to cover that side.
 Here you can see some of the other elements I used: a paper copy of the Flower Shop awning, and a card stock piece for the fence.

 All put together, the awning being paper is curved up slightly like a real awning would be; the middle shop has a popped-out front; the tea room has a popped-out bay window, and the fence next to the tea room is popped-out as well. I was going to use mounting foam tape for this, but of course when I needed it, it was not to be found! So I rolled up plain tape and it worked just fine.

 Here I hope you can see the dimensional effect a little better. I hope those instructions were clear enough!

 The shops all lit up.

 On the other side of the street, I did the windows in the shops but not any dimensional work. I did cut the General Store door open, though, for interest. As you can see, you can add all sorts of little details. You can even make your own sign of your favorite shop to cover the signs on mine:)

Each piece of the village has a "left" and "right" indicated, and the short ends are to be glued behind the Meeting House, which is the middle of the village. Above, you can see what it looks like all put together.

Now for that walk down the street to see the shop lights! I put a short string of Christmas tree lights behind my village (they had small boxes of lights at the Dollar store).


Here I put the lights in front, so you may perhaps be able to see the glitter "snow" all over everything, and the glitter "stars" in the sky. I used big chunky white glitter, but I'm sure super find glitter would be very beautiful too!

Again, the Shops for the sides of the village are here.  Print out on card stock.

Stay tuned for the rest of the village!

The meeting house is here.
The houses for the village are here.
For the post on the woods (that came with the meeting house page) click here.
The farm in the country is here.
New! Mountain background and skating figure here.